
Main Courses
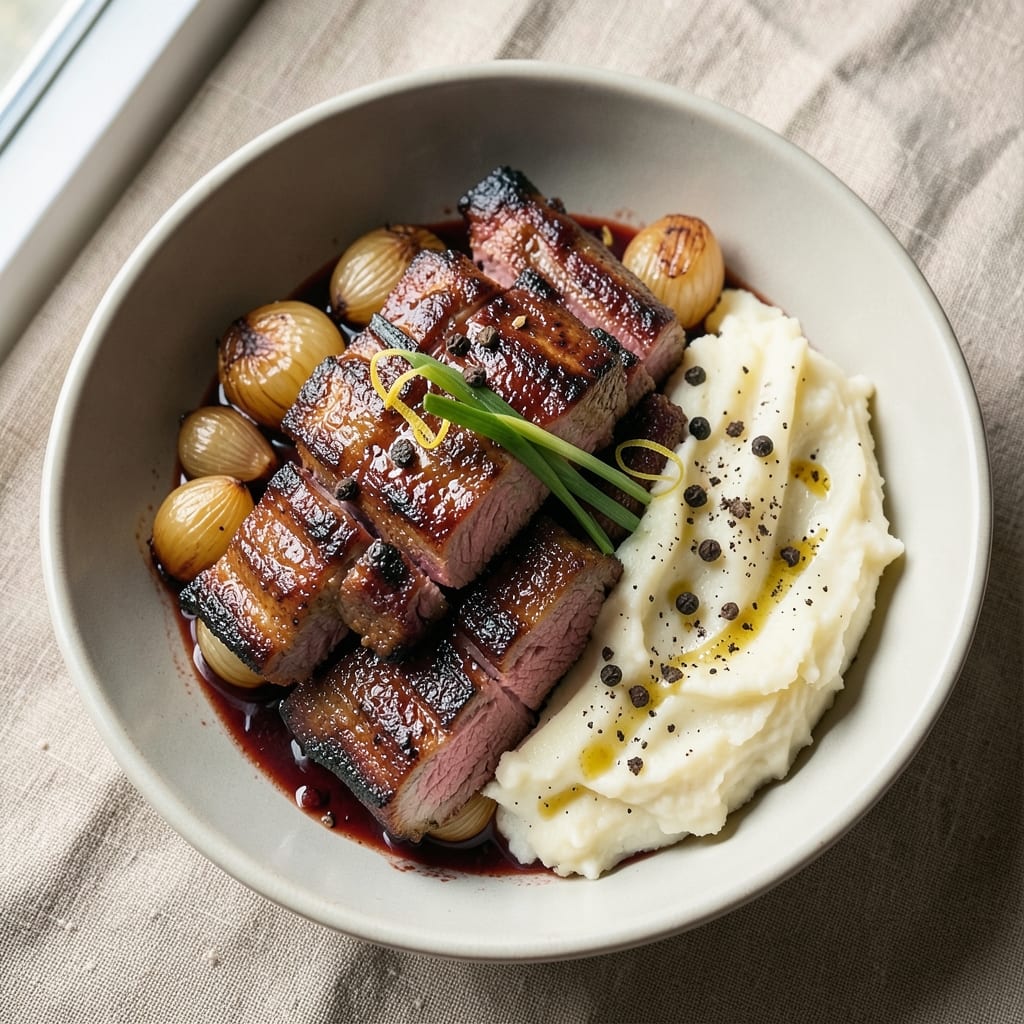
This Angus beef boneless short ribs recipe transforms tough cuts into melt-in-your-mouth perfection through slow braising—a technique that unlocks deep, caramelized flavors and buttery tenderness. The secret lies in low-and-slow cooking, where collagen dissolves into rich, velvety sauce that clings to every bite, making even the most skeptical meat lovers reach for seconds. I’ve perfected this method over years of testing, ensuring restaurant-quality results at home with minimal fuss.
The process begins with a dry brine that enhances natural beef flavors, followed by a sear that creates a flavorful crust before the ribs spend hours simmering in aromatic liquids. This approach preserves moisture while developing complex, savory notes that turn simple ingredients into something extraordinary. The result? Ribs so tender they fall apart with a fork, bathed in a glossy, herb-infused sauce that’s perfect for drizzling over mashed potatoes or roasted vegetables.
What sets this recipe apart is the balance of technique and simplicity—no fancy equipment required, just patience and attention to detail. The rich marbling of Angus beef ensures every bite is luxurious, while the slow braising method guarantees consistent tenderness, even for beginners. By the time you plate these ribs, you’ll have a centerpiece dish that feels like a five-star meal without the effort.
Pair with classic sides like creamy mashed potatoes or a bold red wine reduction to elevate the experience further. The leftovers reheat beautifully, making this a perfect recipe for meal prep or entertaining. Let’s get started on creating ribs that will impress even the most discerning palates.
Ingredients for angus beef boneless short ribs
These premium ingredients unlock restaurant-quality tenderness through slow braising technique.
| Ingredient | Amount | Notes |
|---|---|---|
| Angus Beef Boneless Short Ribs 🥩 | 2 ½ lb | Marbled, 1.5-2 inches thick |
| Kosher Salt 🧂 | 2 tbsp | Diamond Crystal preferred |
| Freshly Ground Black Pepper 🌶️ | 1 tsp | Coarsely cracked |
| Extra-Virgin Olive Oil 🫒 | 2 tbsp | High smoke point preferred |
| Yellow Onion 🧅 | 1 whole | Yellow or red, sliced |
| Garlic Cloves 🧄 | 6 cloves | Peeled, smashed |
| Fresh Thyme 🌿 | 2 sprigs | Stems removed |
| Fresh Rosemary 🌿 | 1 sprig | Needles only |
| Dry Red Wine 🍷 | 1 ½ cups | Bold Cabernet Sauvignon |
| Beef Bone Broth 💧 | 2 cups | Homemade or high-quality store-bought |
| Tomato Paste 🍅 | 2 tbsp | San Marzano preferred |
| Honey 🍯 | 1 tbsp | Wildflower or clover |
| Balsamic Vinegar 🍶 | 1 tbsp | Aged 10+ years |
| Fresh Parsley 🌿 | ¼ cup | Chopped, for garnish |
The Angus beef is non-negotiable here—look for rich marbling and thick cuts (1.5-2 inches) at specialty butchers like D'Artagnan or high-end grocery stores. If your supermarket only carries pre-cut ribs, Costco's Angus selection is consistently reliable. For the dry brine, Diamond Crystal kosher salt dissolves more easily than table salt, enhancing flavor without over-salting. The red wine should be bold—Caymus Vineyards or Opus One are ideal, but any Cabernet Sauvignon with tannins works. Fresh herbs make the difference: Whole Foods Market or farmers markets carry the most vibrant thyme and rosemary, but even grocery store bundles suffice if they're not wilted.
No red wine? Substitute with beef broth and 1 tbsp balsamic vinegar—it mimics the acidity and depth. Running short on fresh thyme? Dried thyme at one-third the amount works, but toast it first in a dry pan for 30 seconds to deepen flavor. The tomato paste can be replaced with crushed San Marzano tomatoes (adjust liquid as needed), though paste adds better texture. For honey substitutes, maple syrup works in a pinch, though it lacks the floral notes. The balsamic vinegar can be swapped for red wine vinegar, but aged balsamic adds complexity that's hard to replicate. If you're prepping ahead, par-cook the ribs up to 24 hours before finishing—they'll reheat beautifully.
Store prepped ribs (uncooked) in the fridge for up to 3 days wrapped tightly in plastic, or freeze for 3 months for future meals. The braising liquid keeps 5-6 days in the fridge—use it for sauces or soups. For leftovers, reheat gently in the same liquid over low heat to maintain moisture. Portion into containers with sauce for easy meal prep. The herbs lose potency after 2 days, so add fresh parsley just before serving. This dish tastes even better the next day as flavors meld—plan accordingly for maximum impact.
Why You'll Love This Recipe
- One-Pan Magic: I swear by this recipe because it’s that simple—just sear the ribs in olive oil, toss in sliced onion, and let the oven do the rest. No flipping, no fussing, just hands-off perfection.
- Rich, Caramelized Payoff: The slow cook turns those ribs into melt-in-your-mouth tenderness with a crust so crispy it’ll make you groan. (Yes, even the onion gets sweet and savory—no waste.)
- Weeknight or Weekend: Throw these on for a lazy Sunday supper or prep them ahead for a stress-free Monday meal. They reheat like a dream, so you’re always covered.
- Budget-Friendly Luxury: Angus ribs feel fancy, but they stretch across multiple meals—freeze extras for later or turn leftovers into tacos, sandwiches, or pasta. Instant upgrade without breaking the bank.
Step-by-step instructions for slow-braised Angus beef short ribs
Transform tough cuts into melt-in-your-mouth perfection using this precise braising technique.
Season and Sear the Short Ribs
Pat the 2.5 lb angus beef boneless short ribs dry with paper towels. This step is crucial—moisture prevents proper browning. In a bowl, combine the 2 tbsp kosher salt and 1 tsp freshly ground black pepper, then rub this mixture all over the ribs, including the edges. Let them sit at room temperature for 30 minutes while you prepare the braising liquid.
Heat a large Dutch oven over medium-high heat. Add the 2 tbsp extra-virgin olive oil and swirl to coat the bottom. Working in batches if needed, add the ribs and sear for 3-4 minutes per side until they develop a deep brown crust. This Maillard reaction creates the foundation for rich flavor. Remove the ribs and set aside on a plate.
Build the Braising Liquid
In the same Dutch oven, add the sliced 1 whole yellow onion and cook for 5 minutes until softened. Add the 6 smashed garlic cloves, 2 sprigs fresh thyme, and 1 sprig fresh rosemary, cooking for 1 minute until fragrant. This aromatic base forms the flavor backbone of your dish.
Deglaze the pan with the 1.5 cups dry red wine, scraping up all the browned bits from the bottom. Let it simmer for 3 minutes until reduced by half. Stir in the 2 cups beef bone broth, 2 tbsp tomato paste, 1 tbsp honey, and 1 tbsp balsamic vinegar. Bring to a gentle simmer and return the ribs to the pot, bone-side up.
Braise Until Fork-Tender
Cover the Dutch oven and transfer to a preheated 300°F oven. Braise for 3 hours, then flip the ribs and add ½ cup water to the pan. Return to the oven and continue cooking for another 1-2 hours until the meat is fork-tender and pulls away from the bone with minimal resistance.
Real talk: Your oven might run hot, so start checking at the 20-minute mark. The ribs are done when they reach an internal temperature of 203°F. If the liquid reduces too much before then, add water in ½ cup increments to maintain moisture.
Finish and Garnish
Remove the ribs from the oven and tent with foil. Let them rest for 15 minutes while you reduce the braising liquid. Strain the sauce through a fine-mesh sieve into a clean saucepan and simmer over medium heat for 8-10 minutes until thickened to your desired consistency.
Garnish each serving with the 0.25 cup chopped fresh parsley and serve immediately with the reduced sauce spooned over the top. The ribs should be so tender they practically fall apart at the touch, with a glossy sauce that clings to every bite.
Pro Tips For Making Angus Beef Boneless Short Ribs
- SEAR IN TWO BATCHES: High heat ruins everything when you crowd the pan. Split those short ribs into two batches—even if it feels like extra work—so they develop that deep, caramelized crust instead of steaming in their own juices. I learned this the hard way after walking away from a pan of ribs that came out gray and sad.
- SALT THE ONIONS: Don’t skip this step—it’s the thing that matters most. Thinly slice that yellow onion and toss it with a pinch of kosher salt and black pepper before cooking. The salt draws out moisture, so it caramelizes faster and adds a subtle depth that raw onion just can’t match.
- USE A MEAT THERMOMETER: Guessing with short ribs is how you end up with leather. Aim for 195°F internal temp—yes, it sounds low, but that’s when the collagen breaks down into silky goodness. If you don’t have one, pull them out at 190°F and let them rest; they’ll climb another 5-10 degrees.
- REST UNDER FOIL: Don’t cut into those ribs the second they hit the plate—that’s how you lose all that rendered fat and juices. Tent them loosely with foil and let them sit for 5-10 minutes. The meat will reabsorb its own juices, and slicing becomes a million times easier (no more fighting with a knife).
Make-ahead tips for this dish
Prep Ahead Strategy
Start by prepping the ribs 24 hours in advance—season them and refrigerate uncovered for 12-24 hours to create a perfect dry brine. This enhances flavor and tenderness without extra effort. Store them in a ziplock bag in the fridge until ready to sear. Honestly, this step alone makes a world of difference. 💪
Partial Cooking
For busy schedules, par-cook the ribs up to 2 days ahead. Sear them as directed, then refrigerate the raw ribs in the braising liquid (covered) for up to 48 hours. When ready to finish, return the ribs and liquid to a 300°F oven and cook for 1-1.5 hours until fork-tender. The flavors deepen overnight, so it’s worth the wait.
Sauce Prep
Make the braising liquid a day ahead—simmer all ingredients except the ribs, then store it in an airtight container in the fridge. When ready to cook, simply add the ribs to the pre-made liquid and braise as usual. This cuts active cooking time by 30 minutes and keeps your kitchen cooler. ✨
Freezer-Friendly
Freeze raw, seasoned ribs in a single layer on a tray for 2 hours, then transfer to a freezer bag with parchment between layers. They’ll keep for 3 months. Thaw overnight in the fridge before searing, or cook directly from frozen in the oven (add 30-45 minutes to braising time). The texture stays just as tender.
Reheating Leftovers
Leftover ribs reheat beautifully—place them in a lightly oiled skillet over medium-low heat with a splash of braising liquid for 5-8 minutes until warmed through. Avoid microwaving, as it dries out the meat. Store leftovers in the fridge for 3-4 days or freeze for 2 months with sauce.
Make-Ahead Sides
Prep sides like mashed potatoes or roasted vegetables the day before. For potatoes, reheat in the oven at 350°F for 10 minutes with a pat of butter. For veggies, store in an airtight container and reheat in the microwave for 2 minutes. This turns your meal into a one-pan wonder on serving day. 💫
Nutrition facts
Frequently asked questions
Why do you recommend boneless short ribs instead of bone-in?
Boneless short ribs cook faster and more evenly, making them perfect for weeknight meals. The bone-in version requires extra time to break down the collagen, but both yield incredible results. For this recipe, boneless cuts simplify prep while delivering the same melt-in-your-mouth texture—just without the need to pick through bones at the table.
Can I substitute beef broth for red wine in the braising liquid?
Yes, but you’ll lose depth of flavor. Replace the 1.5 cups red wine with beef broth and add 1 tbsp balsamic vinegar to mimic acidity. For best results, use a bold red wine like Cabernet Sauvignon—its tannins help tenderize the meat and create a richer sauce.
How do I know when the ribs are fully tender?
Use the fork test: A fully tender rib should pull apart easily with minimal resistance. Aim for an internal temperature of 203°F—this ensures collagen has fully broken down into gelatin. If the sauce reduces too quickly, add ½ cup water to maintain moisture without overcooking the meat.
What’s the best way to reheat leftovers without drying them out?
Reheat ribs in a lightly oiled skillet over medium-low heat with a splash of braising liquid for 5-8 minutes. Never microwave—they’ll turn rubbery. For extra flavor, return them to the oven at 300°F for 15 minutes covered with foil. Leftovers keep for 3-4 days in the fridge.
Can I use this recipe for other beef cuts like chuck roast?
Chuck roast works beautifully with this method—just increase braising time to 4-5 hours for optimal tenderness. The key is patience: slow cooking transforms tough cuts into fork-tender perfection. For chuck, you might need to add ½ cup more liquid to prevent drying out.